Flowers of Oregon 3

To get some tips on photographing flowers, visit this page on our photography tips website, Twisted Tripod.
Flowers of Oregon 2

To get some tips on photographing flowers, visit this page on our photography tips website, Twisted Tripod.
Flowers of Oregon 1

To get some tips on photographing flowers, visit this page on our photography tips website, Twisted Tripod.
Lake of the Woods 3

Splash of Red again!
For details on how this photo was shot and processed, read this post at twisted tripod.
Lake of the Woods 2

..And a splash of Pink
A Colorful Saturday Morning in Summer

Little things that make me happy :-)…an orange Beetle parked at just the right spot outside our apartment complex.
A couple, an arch and the Indian ocean
A couple framed under the arch of Karl Schmidt Memorial, at Elliot’s Beach, popularly known as Besant Nagar Beach in Chennai. In Dec 2009, I visited Chennai to meet some friends and we went for a stroll at the Besant Nagar Beach. It was a cool, cloudy, winter evening….a rarity in Chennai. It reminded me of the start of monsoons in Mumbai…a place which will always be close to my heart. The couple under the arch also reminded me of the countless couples one could see on most days, but especially on such beautiful, cloudy evening, at various sea-facing places in Mumbai.
At the time, I owned a simple (by today’s standards!) digital camera, a Sony-DSC W50 with 3 x optical zoom and 6 MP. This photo is actually a crop from the original one. In a future post, I would probably discuss basic editing and processing effects one could use to make even simple images look more interesting.

Is it love?
Half bounded, half limitless?
Silhouettes in Joshua National Park

Silhouettes Photography is an interesting way to capture different perspectives. This picture was taken during our trip to Joshua Tree National Park during a very sunny afternoon in March 2011. And as many of you would know, a bright sunny afternoon is not the best time to take good photos. There is too much detail, less focus (on the subject) and less contrast in the photos.
And most of us travel with time constraints. We cannot stay in a place for too many days, spending too many mornings or evenings for just the right light, just the right moment. Hence, one needs to learn, how to use the camera well, to make the most of what you have and what the nature offers you 🙂
For more tips on photography, visit www.twistedtripod.com.

Silhouettes let you see things in a “different” light. For tips on how to take interesting silhoutte pics, click on this picture!
A Laugh is just a smile, many times over :-)
Our niece, Ananya, blissfully happy on getting a chance to play “dholak“- Indian musical instrument, like a drum. Visit our website, Twisted Tripod for tips on photographing kids.

Laugh, it’s still the best medicine for feeling young!
A child’s laughter- pure, innocent, blissful…
Smile- Life’s best dietary supplement!
Visit our website, Twisted Tripod for tips on photographing kids.

Sleeping, Smiley Baby
Understanding Depth of Field


Depth of Field
One of the most important things to learn in photography is the concept of Depth of Field. Depth of Field refers to how much of the picture is in focus. When you focus on a particular subject, other objects in the photo are going to be out of focus if they are at a different distance from the focused subject. A shallow depth of field means that only the subject is in focus while everything else is out of focus. A deep depth of field means everything is in focus.
Controlling Depth of Field
The Aperture is the size of the opening in the lens through which light enters the camera and exposes the film. The aperture also controls how much of the photo is in focus. If the aperture is small, everything will be in focus, while a large aperture will make objects, even slightly far from the subject, blurred. The aperture is usually expressed as an F-number and is a ratio of the focal length to the diameter of the aperture. When the camera is set to F/2, it means that the diameter of the aperture is half the focal length. At F/20, the diameter is 1/20th the focal length. Hence F/20 (with a smaller aperture) will given a very deep focus, while F/2 (with a large aperture) will give a shallow depth of field.
With a Large Aperture, objects get out of focus quickly

With a small Aperture, all objects will be in focus

Here’s another example. The focus of the lens is on the letter ‘J’. In the shot with a large aperture (small F-number), the rest of the keys quickly fall out of focus and are blurred. In the shot with a small aperture (large F-number), almost all the keys are in focus –

Using Depth of Field
So, now we know how to control the depth of field, but the question is “why is it important to control depth of field?”. Why don’t we want all our pictures to have a very high depth of field and everything being in focus? Well, it turns out that often times, the background to a photo can be very distracting. To reduce the distraction in the photos, a photographer will make the depth of field shallow. This is often used in Portraits and Macro shots. Experiment with different depth of field settings to see how it affects your photos.
Advanced Topic – Depth of Field and Relative Distance
The rate at which the objects become blur depends on the relative distance from the camera and the object focused on and the other objects. If the subject which is in focus is very close to the camera, then the sharpness will fall very rapidly with distance. For example, if the focused subject is 1 foot away from the camera, a object 1 feet behind it will be much more blurred than the same object when it is one foot behind the subject at 10 feet distance. This is what makes Macro photography so challenging. The following diagrams will illustrate this concept –


Mustard fields in the heartland of rural Rajasthan

“Sarson ke khet” or mustard fields in rural Rajasthan, India on a late wintry morning
Shooting (for) the Moon


The moon shot with a 300mm lens on a clear night. This picture was cropped from the original picture
Shooting the moon can be tricky but rewarding. Here are some tips
Plan your shoot
If you already have a composition in mind, you may want to check out the phase of the moon and it’s location in the sky so that you can plan the time to go take the picture. Some websites like – http://www.moongiant.com/ are pretty informative. Also check out apps like – https://play.google.com/store/apps/details?id=com.lunafaqt&hl=en for planning out your shoot.
The moon is small
You need a camera with a good telephoto lens (good zoom) to capture the moon. Here are 3 different shots taken at 18mm, 55mm and 300mm on a 2/3rd frame DSLR. With a 18mm lens, the moon with look like a little dot in the frame. With a 300mm lens, you can capture enough details to make out some of the big craters.

The Moon gives out a lot of light
Have you ever shot a landscape photo with the moon and saw just a bright ball with no details? That happens because the moon is actually pretty bright and the rest of the landscape is dark. This means that the camera’s meter ends up suggesting an exposure for capturing the dark foreground. To capture details of the moon, you actually need to pick an exposure similar to shooting during the day.
Photomontage
You may have noticed a lot of landscape photos with a large moon in them. These are tough to take because of the two reasons explain above. Firstly, the landscape has to be shot with a 300mm lens to get a decently large moon. Secondly, the exposure has to be such that both the moon and landscape are properly exposed. This is often possible only in the late evening around sunset. In most cases, these photos are created by digitally cutting the moon from an underexposed picture of the moon and pasting it on a picture with the rest of the landscape. Here’s an example of such a photomontage –

Railway Pilatus or Pilatusbahn as seen from Mt. Pilatus, Switzerland

Pilatusbahn or Railway Pilatus as seen from mt. Pilatus
The Pilatus Railway or Pilatusbahn (PB) is a mountain railway in Switzerland and is the steepest rack railway in the world, with a maximum gradient of 48%. The line runs from Alpnachstad, on Lake Lucerne, to a terminus near the summit of Mount Pilatus at an altitude of 2,132 m (6,995 ft). At Alpnachstad, the Pilatus Railway connects with steamers on Lake Lucerne and with trains on the Brünigbahn line of Zentralbahn.
(From Wikipedia)
Looking for more information or booking a trip on Pilatusbahn? You could do it here.


Silhouette

Statue of St. John of Nepomuk on Charles Bridge on River Vltava, Prague

Silhouette of Charles Bridge in Prague
Silhouette Photography is a great way to capture the colors of the sky. They are mostly taken during sunset or sunrise.
Here are some tips to taking interesting silhouettes pics that I have picked up over the years and now sharing with anyone who might be interested:
Choose a good subject
Remember that the details in the subject will be lost and so you want to make sure that the subject has a strong distinctive outline. The fact that the details will be lost is great when the subject has a lot of distracting colors.
Point at the Sun
Point the camera towards the sun. When you do this, the light from the sun is illuminating the other side of your subject and you are shooting the side of the subject which is dark.
For Manual Camera Users
Meter for the subject and underexpose the photograph by a few stops. This will ensure that the subject is dark and also gives you the most colors in the sky. You could also choose to just meter for the sky itself.
For Automatic Camera Users
Most modern point and shoots let you set the exposure on your camera.. you’ll probably see this as +/- EV setting. Set this to -3 EV if possible. The other way to ensure you get the exposure you want is to point the camera towards the sky, half click the shutter release button. When you half click the shutter release button, the camera takes a meter reading and adjusts the camera to expose for the sky. Now, while keeping the shutter release half clicked, point the camera to the subject. Once you’ve framed the subject you wanted, you can press the button completely to take the picture.
Feluccas on River Nile, Egypt

Feluccas on River Nile, Egypt, Jan 2009
While I will be adding more stories about our trips and information about these places in some time, here’s are a few interesting links for those interested in learning more about Egypt, through the eyes of travelers..
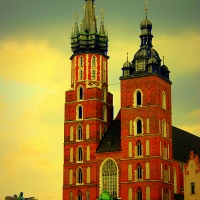
St. Mary’s Basilica, Kraków

St. Mary’s Basilica, Kraków
Mask

Rich vivid colors of an Italian mask- popular as souvenirs among tourists
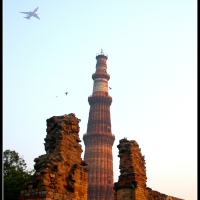
The plane, the birds and the Minar

A plane flies over Qutab Minar, Dec 2008
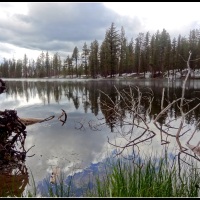
Reflections in the Lily Pond- Lassen Volcanic National Park

Reflections in the Lily Pond
See more pics of Lassen Volcanic National Park in a previous post.

McWay Waterfall, Julia Pfeiffer Burns State Park

Beautiful ocean on one side, Mcway Waterfall on the other
Mcway Waterfall is also referred to as “tidefall”, since it empties directly into the ocean.

..and a flock of birds in the middle…stopping by for a cool summer drink..


 Awesome tips for Flower Photography
 Composition Guidelines for Landscape Shots
 Getting the right Background for Macros and Flower shots
 Photographing Kids
 Photography Tips and More